As an Admin (GitLab Self Hosted Repository)
This section will guide you in setting up your GitLive organization through your self-hosted repository hosting service (Currently GitLive only supports GitLab self-hosted).
Overview
In this quick guide you will learn how to install the GitLive app on your self hosted GitLab instance as an administrator.
Steps for authenticating
As an administrator, you are required to install the GitLive app on the group level and grant it access to the repositories that you would like to use GitLive with. Note that your instance will need to be accessible from the internet.
Step 1
- Install the plugin as explained in the installation section.
- Open up a clone of the repository that you want to use GitLive with.
- Then, you will see the following prompt in the GitLive window:

Step 2
After clicking on Configure new GitLab server, follow the setup instructions. You’ll start by adding a new OAuth application in GitLab, this will allow you to set the right scopes, and get the GitLab Application ID and Secret, which is needed for the set up.

When adding a new application, it’s important to make sure that you are selecting the correct options, as specified in the instructions.

Step 3
The next step is to authenticate and install your newly created GitLab application on the group of your choice.
|
|
Step 4
Finally, you will see a screen showing you that GitLive has been installed successfully, with the option to connect your issue tracker to enable our issue tracking integration.

Adding a Custom URL
If your remote URL is not accessible from the internet via HTTP or HTTPS, you can add a custom URL that is accessible from the internet. This URL will be used for communication between your GitLab instance and our servers.
To add your custom URL, follow the prompt in the footer of the GitLive pane in your IDE which says “Specify self-hosted GitLab instance URL”. You will then be redirected to a page where you can enter your custom URL.

You’re all set!
- You can now have your team members install the plugin and authenticate. See the setting up as a team member section.
Overview
In this quick guide you will learn how to install the GitLive app on your self hosted GitLab instance as an administrator.
Steps for authenticating
As an administrator, you are required to install the GitLive app on the group level and grant it access to the repositories that you would like to use GitLive with. Note that your instance will need to be accessible from the internet.
Step 1
- Install the plugin as explained in the installation section.
- Open up a clone of the repository that you want to use GitLive with.
- Then, you will see the following prompt in the GitLive window:

Step 2
After clicking on Configure new GitLab server, follow the setup instructions. You’ll start by adding a new OAuth application in GitLab, this will allow you to set the right scopes, and get the GitLab Application ID and Secret, which is needed for the set up.
When adding a new application, it’s important to make sure that you are selecting the correct options, as specified in the instructions.
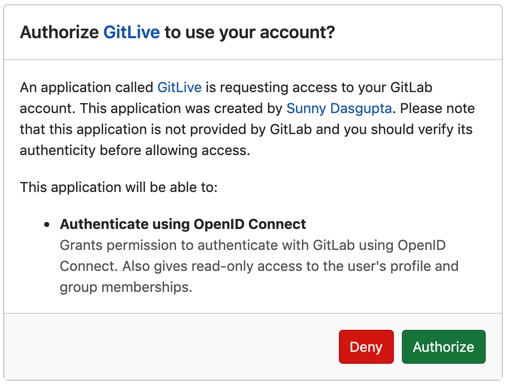
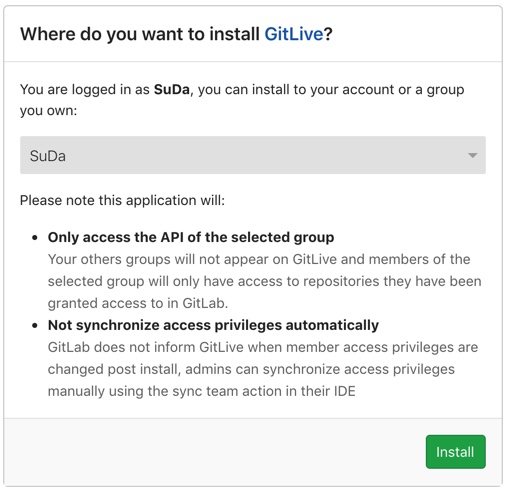
Step 3
The next step is to authenticate and install your newly created GitLab application on the group of your choice.
|
|
|
Step 4
Finally, you will see a screen showing you that GitLive has been installed successfully, with the option to connect your issue tracker to enable our issue tracking integration.
Adding a Custom URL
If your remote URL is not accessible from the internet via HTTP or HTTPS, you can add a custom URL that is accessible from the internet. This URL will be used for communication between your GitLab instance and our servers.
To add your custom URL, follow the prompt in the footer of the GitLive pane in your IDE which says “Specify self-hosted GitLab instance URL”. You will then be redirected to a page where you can enter your custom URL.
You’re all set!
- You can now have your team members install the plugin and authenticate. See the setting up as a team member section.
Overview
In this quick guide you will learn how to install the GitLive app on your self hosted GitLab instance as an administrator.
Steps for authenticating
As an administrator, you are required to install the GitLive app on the group level and grant it access to the repositories that you would like to use GitLive with. Note that your instance will need to be accessible from the internet.
Step 1
- Install the plugin as explained in the installation section.
- Open up a clone of the repository that you want to use GitLive with.
- Then, you will see the following prompt in the GitLive window:
Step 2
After clicking on Configure new GitLab server, follow the setup instructions. You’ll start by adding a new OAuth application in GitLab, this will allow you to set the right scopes, and get the GitLab Application ID and Secret, which is needed for the set up.
When adding a new application, it’s important to make sure that you are selecting the correct options, as specified in the instructions.
Step 3
The next step is to authenticate and install your newly created GitLab application on the group of your choice.
|
|
|
Step 4
Finally, you will see a screen showing you that GitLive has been installed successfully, with the option to connect your issue tracker to enable our issue tracking integration.
Adding a Custom URL
If your remote URL is not accessible from the internet via HTTP or HTTPS, you can add a custom URL that is accessible from the internet. This URL will be used for communication between your GitLab instance and our servers.
To add your custom URL, follow the prompt in the footer of the GitLive pane in your IDE which says “Specify self-hosted GitLab instance URL”. You will then be redirected to a page where you can enter your custom URL.
You’re all set!
- You can now have your team members install the plugin and authenticate. See the setting up as a team member section.